Photo to Laser Engraving File
Turn any photo into a laser-ready dithered bitmap at the exact size and line spacing of your laser, with presets for wood, slate, acrylic, anodized metal, leather and tile.
To convert a photo for laser engraving for free, drop it in the tool above, pick the material (wood, slate, acrylic or glass, anodized metal, leather or tile) and type the width in mm. The photo is dithered at your laser's real DPI, previewed on the material, and saved as a PNG with the DPI written in (it imports at the right size in LightBurn, LaserGRBL and xTool), a 1-bit BMP or an SVG. No sign-up, no watermark, no upload.
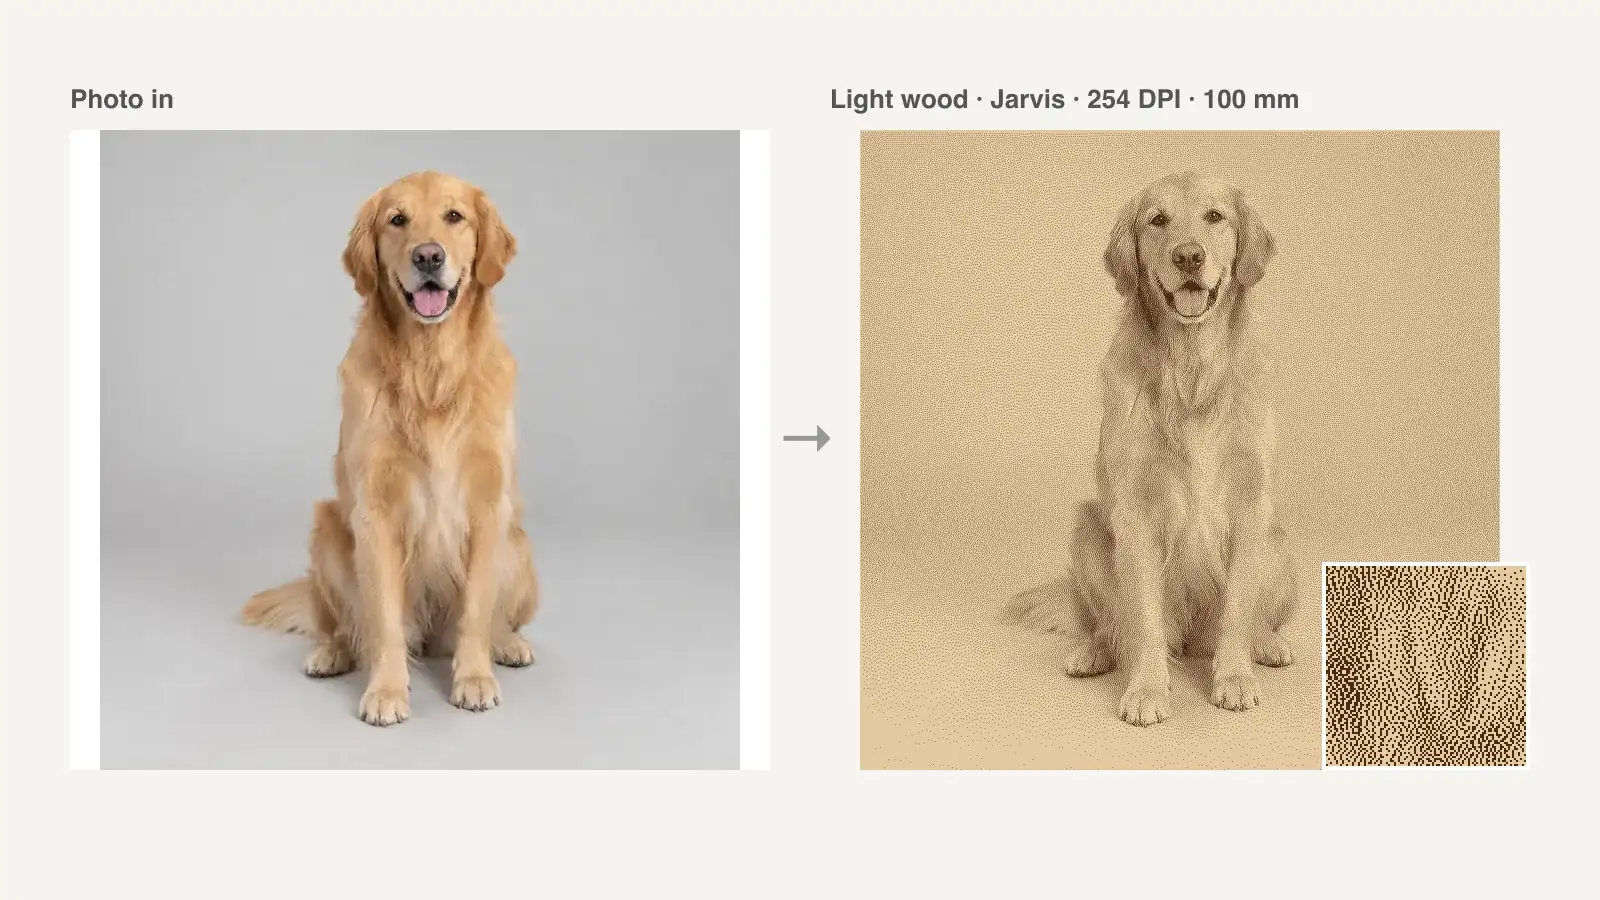
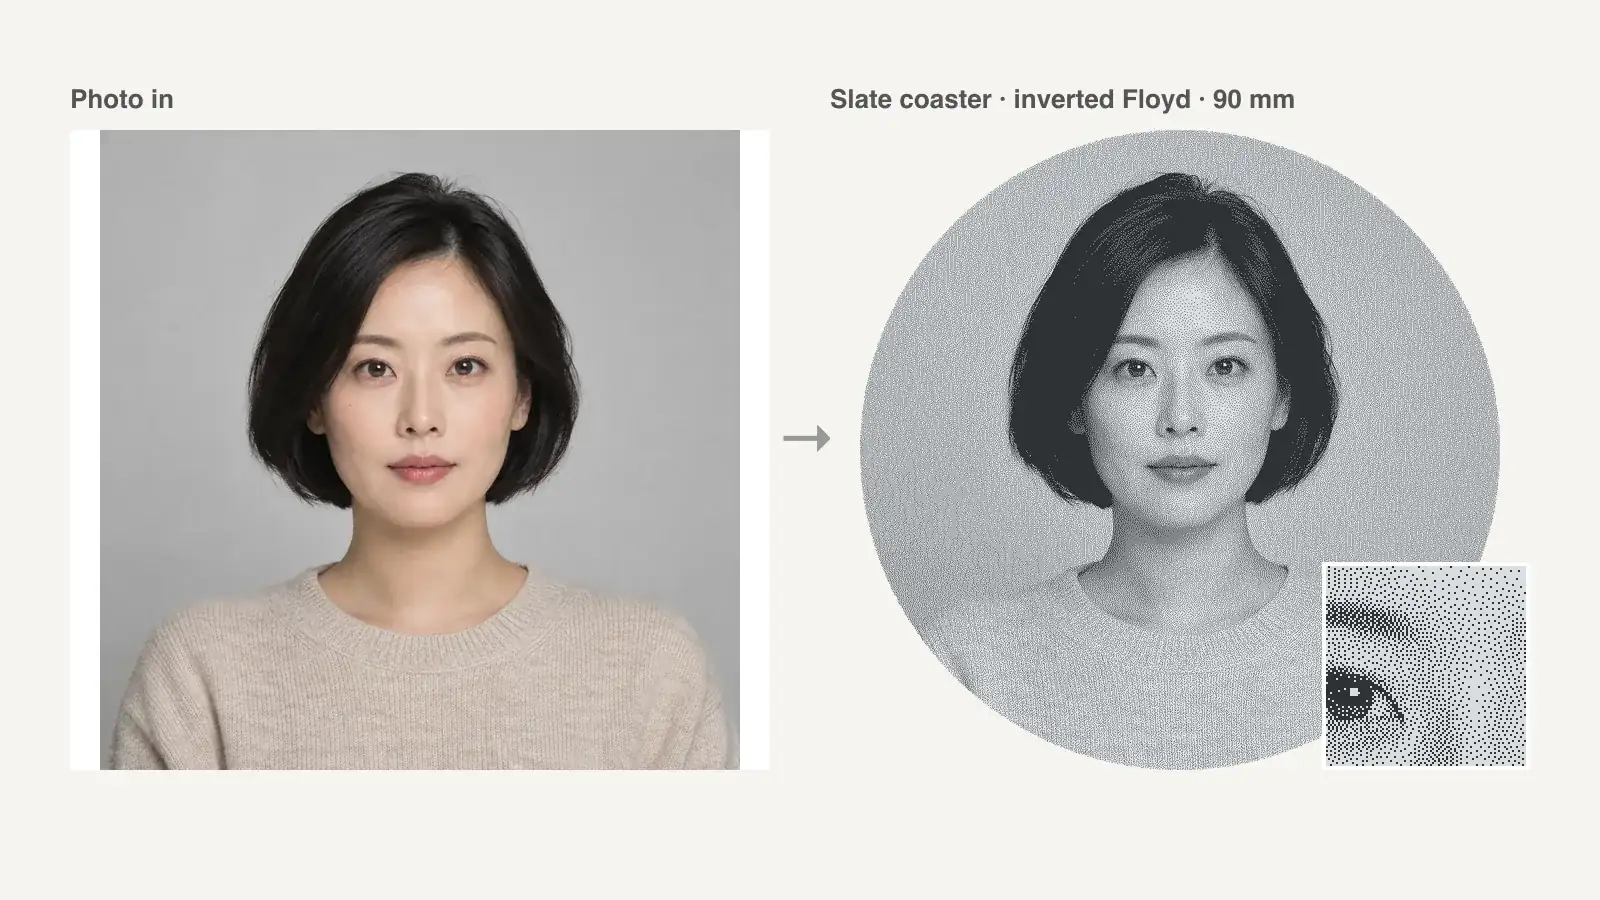
In short: To convert a photo for laser engraving, drop it into the MeshShift tool above, pick your material and type the width in millimetres. The photo is resized to the laser's real line spacing (254 DPI is 10 lines per mm), adjusted for that material (lifted shadows on wood, inverted for slate, inverted and mirrored for clear acrylic or glass) and dithered into dots the laser can burn.
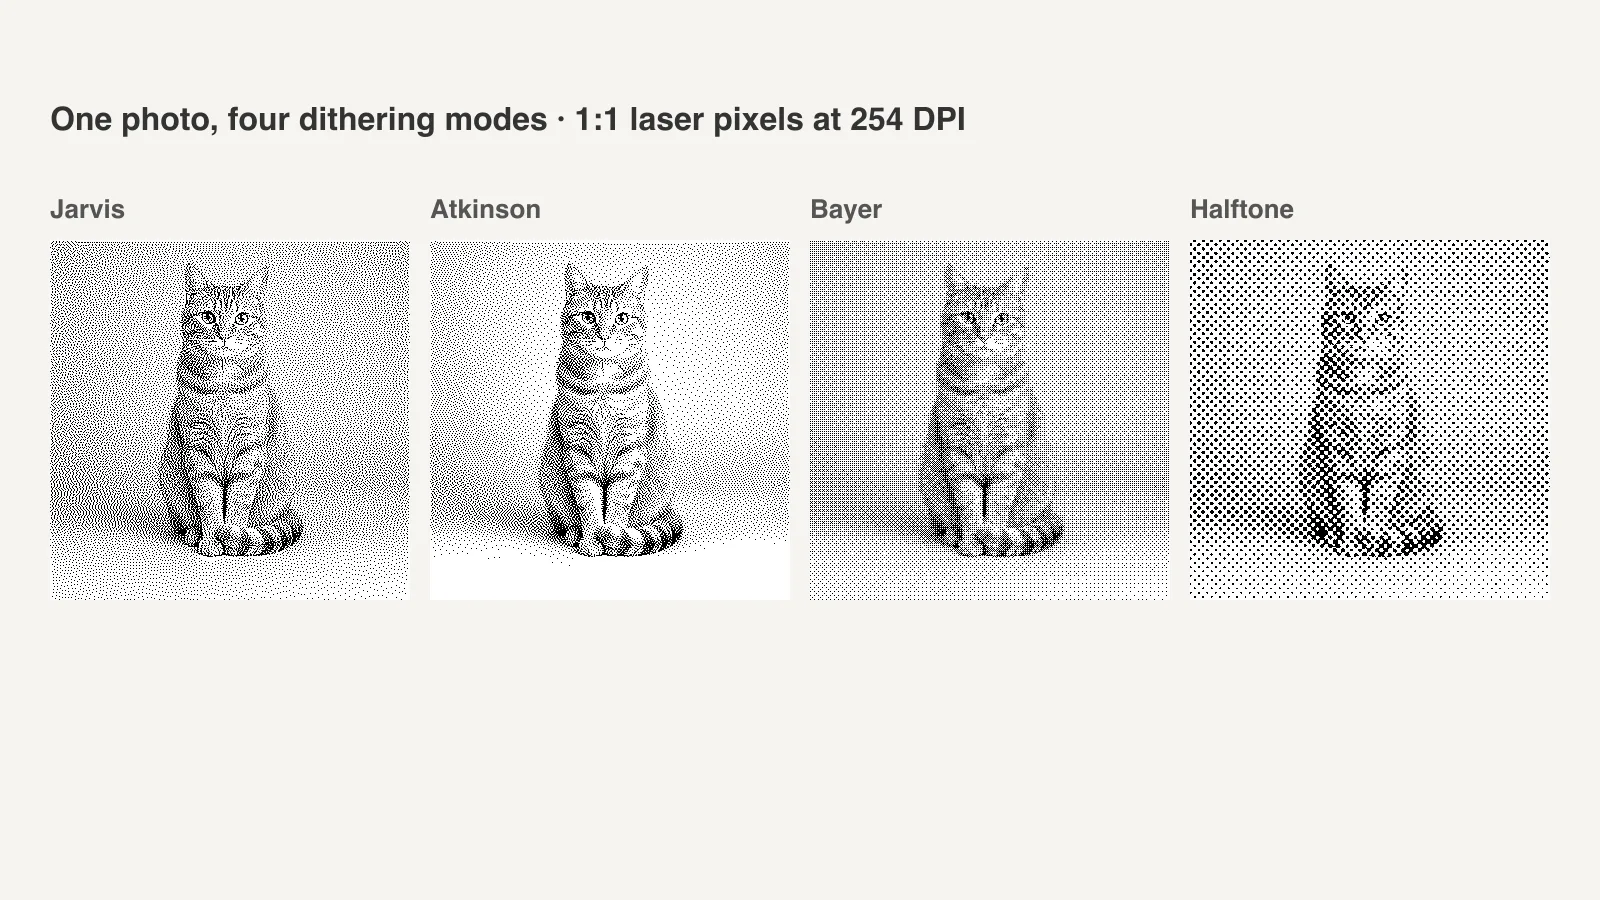
There are nine modes: Jarvis, Stucki, Floyd–Steinberg, Atkinson, Sierra, ordered Bayer, halftone dots, plain threshold and grayscale for power-modulated engraving. The preview shows the result on the material and at 1:1 pixels. Download a PNG with the DPI written into the file, so LightBurn, LaserGRBL and xTool Creative Space import it at the size you chose, or a 1-bit BMP for EZCAD, or an SVG sized in mm. It is free, with no sign-up, watermark or daily limit, and the photo never leaves your browser.
How to use the Photo to Laser Engraving File tool
- Drop a JPG, PNG, WebP or HEIC photo on the tool.
- Choose the material: light wood, slate, clear acrylic or glass, anodized metal, leather or painted tile.
- Type the width in mm and pick the DPI your laser engraves at.
- Pick a dithering mode and adjust brightness, contrast, gamma, white point and sharpening while watching the preview.
- Download the PNG (DPI included), 1-bit BMP or SVG and import it into LightBurn, LaserGRBL, xTool Creative Space or EZCAD.
How to turn a photo into a laser engraving, step by step
- Drop the photo on the tool. Faces, pets and landscapes with clear light and shadow engrave best; very dark or flat photos need more contrast.
- Choose the material. Each preset sets the DPI, the dithering mode and the tone curve that usually works, and the preview switches to that material's colours.
- Type the width in millimetres. The height follows the photo, or pick Circle for a coaster or ornament and the photo is cropped to a square first.
- Fine-tune brightness, contrast, gamma and the white point while watching the preview. Tick "Zoom to 1:1 pixels" to see the real dots the laser will burn.
- Download the PNG. In LightBurn set the layer to Image mode with "Pass-through" (the file is already dithered) and the line interval to match the DPI shown under the preview.
Which dithering mode to use
- Jarvis and Stucki spread the error over a wide area and give the smoothest tones. They are the safest choice for portraits on wood and leather.
- Floyd–Steinberg gives a finer, tighter grain. It suits materials with crisp marks such as slate, anodized aluminium and coated tiles.
- Atkinson throws away a little of the error, which keeps light areas clean and adds punch. It works well on acrylic and glass where marks are frosted white.
- Ordered (Bayer) makes a regular pattern without "worm" artefacts, useful on woods with strong grain.
- Halftone dots look like newspaper print and forgive heat spread on soft woods; set the dot cell size.
- Threshold is for logos, text and line art: every pixel is either burned or not.
- Grayscale keeps 256 levels for lasers that vary power per pixel (LightBurn Grayscale or 3D Sliced mode).
Settings by material
- Light wood and plywood: 254 DPI, Jarvis, a little extra contrast and gamma 1.1. Burns spread, so shadows are opened slightly.
- Slate and black stone: 254 DPI, Floyd–Steinberg, inverted. The laser marks slate light grey, so dark parts of the photo must get the most burn.
- Clear acrylic and glass: 254 DPI, Atkinson, inverted and mirrored, so you engrave the back and look through the front.
- Anodized or black-coated metal: 318 DPI, Floyd–Steinberg, inverted. The coating comes off to bare silver.
- Leather: 254 DPI, Stucki, more contrast and a lowered white point so it doesn't turn muddy.
- Painted tile (white coat, black mark): 318 DPI, Jarvis, normal tones.
These are starting points. Always run a small test square first: speed and power on your machine matter as much as the image.
Why the DPI and size matter
A laser burns one row per line interval. If the image has more pixels per row than the laser can resolve, dots merge and the photo turns dark and blotchy; if it has fewer, the software scales it up and the dither pattern is ruined. The right way is to dither at exactly the resolution you will engrave.
That is what the tool does: the width in mm times the DPI gives the pixel count, the photo is resized to it before dithering, and the DPI is stored in the PNG (and BMP) header. LightBurn, LaserGRBL and xTool Creative Space read that header, so the file arrives at the size you typed, with one image pixel per laser dot. For diode lasers 254 DPI (0.1 mm) is the usual start; CO2 and fibre lasers can go finer.
MeshShift vs other photo-to-laser tools
PhotoEngraving.online is free and also runs in the browser, with brightness, contrast, gamma and sharpness controls and PNG or BMP export. ImagR prepares images with automatic workflows and material previews, with paid plans for its advanced features. LazePrep adds background removal. Dithx focuses on dithering patterns.
MeshShift does the whole job on one page for free: nine dithering modes including halftone and ordered patterns, six material presets that set DPI, tone, invert and mirror together, circle and rounded frames for coasters and ornaments, a material preview and a 1:1 dot view, and three export formats with the physical size written in. Nothing is uploaded and there is no account. If you'd rather turn the same photo into a 3D print, the lithophane maker and image to STL tools on this site work from the same photo.
Frequently asked questions
Is this photo to laser engraving converter free?
Yes. Every setting and all three downloads (PNG, 1-bit BMP and SVG) are free, with no sign-up, watermark or daily limit. The image is processed in your browser, so it costs us nothing per photo.
Is my photo uploaded?
No. The photo is resized, adjusted and dithered by JavaScript in your browser tab and the file is saved straight to your downloads. You can check in your browser's network panel that nothing is sent.
What file should I import into LightBurn?
Use the PNG. It already contains the dithered dots and the DPI, so LightBurn imports it at the width you chose. Set the layer to Image, choose "Pass-through" (or Threshold) so LightBurn doesn't dither it a second time, and set the line interval to the value shown under the preview, for example 0.100 mm at 254 DPI.
Which DPI should I use for laser engraving photos?
254 DPI (0.1 mm line interval) is a good start for diode lasers on wood. Use 318–339 DPI for slate, anodized aluminium and tile, where marks are crisp, and 169–200 DPI for soft woods or cheap plywood where burns spread. Match the DPI to the line interval you set in your laser software.
Why does my engraved photo come out too dark?
Burns spread, so a photo that looks right on screen engraves darker. Raise gamma above 1, lower contrast a little, or lower the DPI so dots have room. Check that your laser software isn't dithering the image a second time, and run a test square to lower power or raise speed.
How do I engrave a photo on slate, black anodized metal or glass?
Pick that material preset. Slate and anodized metal mark lighter than the surface, so the photo is inverted; clear acrylic and glass are inverted and mirrored so you can engrave the back. The preview shows the result in the material's colours.